Before trying this tutorial, please note that I am not a professional and never claimed to be. There may be easier or more professional ways to do some of these things. This is just how I went about getting the finished product you see here. :) Also - I apologize for the terrible lighting in these pics.
The first thing I did was get some measurements. I measured Ryleigh's chest - just below her armpits. She measured 23". I knew I'd want about double that and since my fabric was a 46" width it worked out perfectly. I then I measured about how long I wanted it. I measured from just under her armpits to where I wanted it to fall on her legs. Then you're going to want to add about 2" to that measurement to allow for making an elastic casing and hem.
Now that you have your measurements, take your fabric, fold it in half with right sides together. If you have a directional print like I do, make sure you figure out top/bottom, etc before cutting. Cut out the size pieces you need. For Ryleigh, I needed 2 - 23"x25" pieces.
 With right sides still together, sew a 5/8" seam down each long side.
 You should then have basically a tube - or a pillowcase with no bottom.
 This step is totally optional, but I like to finish my seams to give the item a more finished look. Serge the seams you just made. Some people may choose to just serge the seam and skip the step of sewing the seam first. I don't know why, but I don't like to do it that way. I guess I like to make more work for myself and do it in two steps. ;-)
 Press the seam to one side.
 On the outside, top=stitch close to the seam, making sure you catch the seam on the underside.
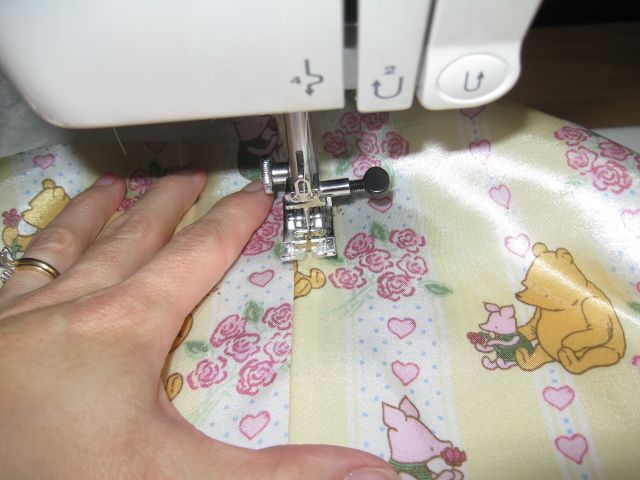 This will tack the seam down so it isn't bothersome to the person wearing the garment. It also gives a more professional look. This is what it looks like on the outside:
 And on the inside:
 Next, serge the top edge of the dress/nightgown. Again, this is an optional step. If you'd rather just fold it under, you can. But I prefer to do it this way because it makes it gives you a nice, even, and clean line that's easy to work with.
 Fold down about 1" from the top, then fold under the bottom edge - just to where the serging stops. Press. Please note: These measurements are to make a casing for 1/2" elastic. You will need to adjust your measurements for a different elastic width.
 Stitch close to the edge leaving an inch or two unstitched so you can insert the elastic.
You now have an elastic casing.
 Cut a piece of elastic as long as the chest measurement you got. Mine is 23". Put a safety pin on one end of the elastic and thread it through the hole you left in the casing.
 Once you have threaded the elastic all the way through, sew the ends of the elastic together being sure to go back and forth over it several times.
  Distribute the fullness of the garment evenly and then close up the hole you left in the casing. You may wish to sew through the elastic right at the side seams to keep the elastic from twisting.
This is what you should have now:
 Moving on to the straps. You will need to do some more measuring here. Put the nightgown on the child and then measure from the bottom of the casing on the back, over the shoulder, and to the bottom of the casing on the front. I got a measurement of 10". Then decide how wide you want your straps. I wanted a finished strap width of 1.5". Double that and add 1" for the seam. So, I need two pieces of fabric that measure 4"x10".
  I wanted to add a little trim to my straps. I had this trim in my stash that was nice and soft and light-weight, perfect for this project! So, I cut 2- 10" long pieces. Then I placed the trim on top of my strap piece with raw edges even.
  Then I folded the strap piece in half with right sides together and the trim sandwiched in between.
 Stitch a 1/2" seam and then turn right side out. This is what you should have:
 Top-stitch close to each edge. Then serge the short ends.
 Now you'll want to have the child put the dress back on and determine the best placement for the straps. Then stitch the straps on - once close to the bottom of the strap and then again close to the top edge of the nightgown. Here it is:
 And a view of the inside stitching of the strap:
 Now you could just hem the bottom and be done! I decided I wanted to add a little of the trim I used on the straps to the bottom of the gown. So, measured the bottom of the gown, added 1/2" to the measurement and cut two pieces of the trim this size.
 I layered the two pieces of trim on top of each other and stitched them together.
 Then stitch the two short ends together with right sides together and a 1/4" seam. Serge for a finished seam.
Now with right sides together, raw edges even, and the trim seam lined up with one of the side seams on the gown, stitch the trim to the bottom of the gown.
 Serge the seam.
 Press the seam towards the trim.
 Top-stitch close to the seam. This is what it will look like - inside and outside:
 And there you have it! An adorable little nightgown!
 Ryleigh just loves it! I think I might need to make her another one.


 Serge the seam.
 Press the seam towards the trim.
 Top-stitch close to the seam. This is what it will look like - inside and outside:
 And there you have it! An adorable little nightgown!
 Ryleigh just loves it! I think I might need to make her another one.
Its hard to tell how long it took me to make this because I to keep stopping to deal with dinner time and bath time, etc plus I was stopping to take pics of each step. But, I'm pretty sure I could do this in an hour of uninterrupted sewing time. I still have plenty of fabric left - I think I might make her a shorts/top set using the same design for the top - just cutting it shorter and then making a little pair of pj shorts to go with it. Too cute! If you're buying fabric for this project, 1yd will be plenty. Or, use a pillowcase! Cheap, easy, and adorable project!


How funny! I made my daughters nightgowns EXACTLY like this for Christmas last year. Yours is beautiful.
ReplyDeletenice work you did. I really like it
ReplyDelete9th class notes
http://notes.com.pk/category/notes/9th-class-notes/
good work you did
ReplyDelete10th class notes