You will need:

-A sewing machine
-Some fabric scraps - I would recommend fleece, or terry. Flannel would work as well, but it won't provide as much protection from the cold popsicle. I used fleece. For each freeze-pop sleeve you will need approximately a 6" x 8" piece (this is allowing a little extra). If you are buying new fabric instead of using scraps, 1/4 yd will make you a whole stash of these. Check the remnant bins at your local fabric store!
-Iron
-Scissors
-Rotary cutting tool and mat (optional)
-Pins
-Ruler or measuring tape
1. Measure the width of your child's favorite freeze-pop. Add 3/4" to this measurement. This is how wide you will need to make your pieces. I made mine 2 1/4" wide.
2. Cut out your pieces. You will need:
-2 pieces measuring: the width you got from step #1 x 5.5"
-1 piece measuring: 1"x the width you got from step #1
I used the rotary cutting tool and mat for this. But, if you don't have those items you could just use your ruler/measuring tape to mark the fabric, and then cut out the pieces with scissors.
 3. On the two big pieces, fold under 1/4" on each short end. Press.
 4. Sew close to the raw edge.
  This is now what you should have:
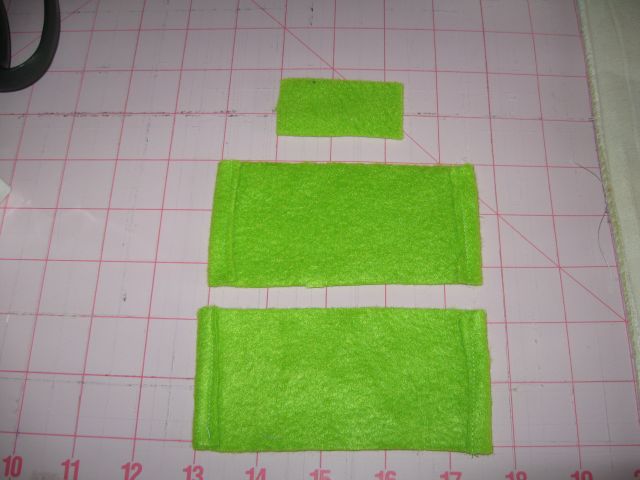 5. Place one of the big pieces RIGHT side UP. Then place the small piece on top of it - placing it in the center.
 6. Place the remaining big piece RIGHT side DOWN. So now you have your two big pieces right side together with the small piece sandwiched in the middle. You may wish to pin these layers together before sewing. I chose not to for such a small item.
7. Sew a 1/4" seam down each of the long sides being sure to back stitch at each end.
 This is what you should have now:
 8. Turn the sleeve right side out. Press.
Voila!!! A freeze-pop sleeve!
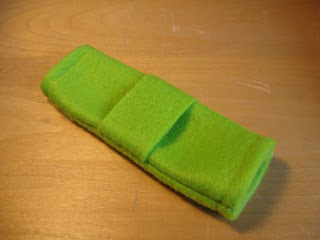 This can slide up and down on the freeze-pop. The middle piece is so that you can fold up the bottom to keep the ice from sliding down. Unfortunately, when Shelly asked me to do this I only had ONE freeze-pop remaining in my freezer. And I ended up losing it to Isaac while I was trying to come up with the design for this thing. So, I can't show you a pic of it on a freeze pop, and I'm not exactly sure how the middle piece will work. If you don't like the middle piece, you can easily make one without it. I'll be sure to update with pics once I re-stock my freezer with pops. If you end up making some of these, I'd love to hear from you about how you liked the tutorial and the finished product. Pics are welcome as well! :) Enjoy your freeze-pops! :)
 This can slide up and down on the freeze-pop. The middle piece is so that you can fold up the bottom to keep the ice from sliding down. Unfortunately, when Shelly asked me to do this I only had ONE freeze-pop remaining in my freezer. And I ended up losing it to Isaac while I was trying to come up with the design for this thing. So, I can't show you a pic of it on a freeze pop, and I'm not exactly sure how the middle piece will work. If you don't like the middle piece, you can easily make one without it. I'll be sure to update with pics once I re-stock my freezer with pops. If you end up making some of these, I'd love to hear from you about how you liked the tutorial and the finished product. Pics are welcome as well! :) Enjoy your freeze-pops! :)

Yippee! We can't wait to try them! My kids hands thank you!!
ReplyDeleteYou are so clever! I'm definitely going to try this for Olivia and friends. Thanks Jenn!
ReplyDelete